TM 1-6625-724-13&P
0075 00
0075 00-7
PROCEDURE 2: CONFIGURE AVA
a. Inventory and remove AVA blade tracking equipment from transport cases. Check for possible damaged
equipment and frayed cables.
b. Ensure DAU is installed in canvas carrying case.
c. Secure DAU to seat using lap belts and the DAU’s straps and D-rings.
NOTE
If the seats are not installed, the DAU can be secured to
the floor’s tiedown rings.
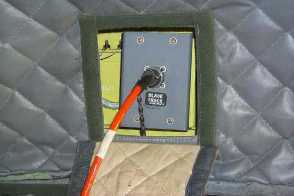
d. Connect the 15-ft. cable assembly (29085700) to the BLADE TRACK bulkhead receptacle, located on the right
side of the cabin near station 256. See figure 4.
e. Connect the 15-ft. breakout cable (29085700) terminations to the DAU receptacles marked MULTI-CH,
TACHO1 and 28VDC.
f. Connect the 10-ft. CADU to DAU cable (29325601).
Figure 4. BLADE TRACK Bulkhead Receptacle near STA 256
PROCEDURE 3: FORWARD UTD INSTALLATION
a. Remove 6 screws (3 fwd, 3 aft) from the access panel located on the chin of the aircraft. See figure 5.
b. Place forward blade UTD bracket (29141700) over screw holes with the arrow on the bracket pointing forward
(the stepped foot should be aft) and attach to the aircraft with the removed screws.
c. Attach the sun shield (29722100) by placing the sun shield over the UTD (29310700) sensor receiving lens.
Then swing the sun shield locking arm under the body of the UTD, placing the UTD bolts through the arm. This
will place the arm between the UTD and bracket.
NOTE
If the UTD captive mounting bolts are lost or damaged,
use NAS1305-14 bolts as alternate replacements.
d. Attach UTD (29310700) to bracket (29141700) using the bolts provided. Ensure that the arrow on the UTD
body points in the direction of the forward rotor rotation.
e. Attach the 25-ft UTD cable (29325701) to the FWD UTD.
f. Route UTD cable through nose compartment access panel located above UTD past copilot’s feet, adjacent to
the center console, and aft to the DAU.
g. Connect UTD cable to the receptacle on the DAU marked TRACKER 1.


